


June 2026:
Three teats, fourth teat present or actually not?
Do we still need to properly configure whether the fourth teat is present or not on the VMS V300?
With the VMS Classic, we know that this is very important.
Whether you have entered “present or not present” for a three-teat cow: the VMS V300 has no trouble attaching her.
However, if the fourth teat is set to “present,” after milking it wants to disinfect all teats marked as present …
And if that teat is (almost) completely gone, it doesn’t see it and, after some searching, starts spraying “blindly” and making a circle. In doing so, the camera arm sometimes touches the leg, and the cow doesn’t like that at all. And neither will you, because it uses more disinfectant and doesn’t even land on the teats as precisely as you are used to…
So with the V300, for the three teats as well, make sure to correctly enter whether the fourth teat is actually present or not (anymore).
And of course: check occasionally if the spray is landing properly on the tip of the teat!
A little clogged and it sprays next to the teats….
November 2025:
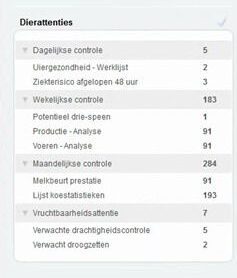
Most interesting lists at the front of the Attention Board.
On the left side of the Attention Board, there’s a block containing the lists Delaval thinks are the most important of all available lists.
But you and I often have different opinions about that!
From the entire arsenal of lists offered by DelPro or created by you or your advisor, you can choose which ones you actually want to see there.
How can we customize these to our own preferences?
When you click the yellow Lists tab, you’ll find all available lists.
By right-clicking the list you want, you’ll get many options, including “Add to Attention board.” We’ll confirm this. You’ll then be asked which chapter you want to add it to, or you can create a new chapter.
An icon will then appear next to that list.
For lists that also have such an icon but that you never view, you can remove that icon in the same way.
Then we return to the Attention Board. Let’s refresh it first!
Above the block with preferred lists, you’ll see a faint “V” sign. Click on it.
This will display all lists with an Attention Sign icon.
The list you added will now be listed, but it still needs to be checked.
Only the checked lists will be shown when you click the “V” above the block again.
An example of what it might look like (in Dutch):
Daily checklists
Weekly checklists
Monthly checklists
Fertility checklists
July 2025:
Grouping and Ungrouping.
With some lists it is very useful when you do not see the performance of the individual cows for an overview, but for example only the cows of lactation 1 and subsequent lactations or of certain lactation stages depending on each other. So that you can see how that couple of animals is doing on your farm.
It is very interesting to view the performance of both the animals you want as a group but also the individual cows or the entire herd in the same list.
And if you have indicated in DelPro which breed the cows have or which father then you can also easily Group on that.
You can easily do this by clicking on the right mouse button in the gray area where your choice, for example lactation number, lactation stages, …., is located and clicking on “Group by this column”. (View place and symbol in Dutch)
It becomes even more fun when you click on “Average” or “Sum” below interesting colums, again with the right mouse button. Then you can see how the results are per group.
Or how often a diagnosis occurs or how much of a medicine has been used.
And when you want to put it back to animal level, in the same place where “Group by this column” was, it now says “Ungroup”
This is very useful for feed lists and production lists, but also for Diagnoses and Treatments.
And once you know this option, you will definitely use it more! Have fun!
December 2024:
Automatic Milk Permission.
This is not the first time that we have Tippen about the automatic milk permission.
Since DelPro update 10.x, the possibilities have been expanded again, hence this Tip.
We used to have 3 possibilities, for the newly milked cows, for the cows that are further in lactation and for the cows that almost have to be dried off.
Then in the first period the hours after the last milking and in the second period the expected milk yield were leading for permission for the next milking.
This has been expanded to 5 possibilities, and in this way we can make the milk permission even more gradual.
We still give the cows permission again in the first period, the first 50 – 60 days after calving, from 5 hours after the last milking. But afterwards, depending on milk production and occupancy on the robots, the permission for hours after the last milking can be increased more gradually. But those hours still need to be increased, for example in the first period to 5 hours but second period to 7 or 8 and third period to 8 or 9. The penultimate period to 9 or 10 and for drying off the hours to 11.
We leave the expected milk yield almost the same, for heifers to 8 or 9 litres and older cows to 9, 10 or 11 litres, depending on the daily production of your cows and the occupancy on the robots.
All this with the aim of distributing the available milkings per day, at most companies between 150 and 200 milkings, as efficiently as possible. And for the individual cow it also applies: both too often and too few milkings per day are not good for the udder health.
We only lower these settings in the first weeks after you have started with the robot(s) and sometimes for a short period if the cows are not coming well.
But especially the latter must be solved differently!
November 2024:
Fluctuations in daily production, incomplete milkings, kicking off, etc.
When you look at the Attention board at Daily production overview, there is a symbol of a graph at the top right. If you click on it, a graph will appear where you can see over a longer period what the average daily production has been in the period you specified.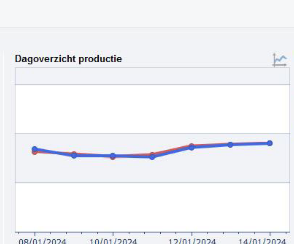
It is interesting to look at this over a period of a year or even longer.
The average number of milkings per day can be seen and also whether more or fewer incomplete milkings or kicking offs occurred in a certain period or on certain days.
Sometimes you see slow changes, sometimes peaks or troughs.
Can you remember why things went less well or better than average in certain periods / days? For example, a major ration change, hoof-trimming day, many new heifers calved, a long standstill due to a malfunction or service, ….. .
And, even better, can some negative changes be prevented in the future?
February 2023:
Is the milk permission still good?
The automatic milking permission also needs to be adjusted from time to time, for example if the production per cow or the number of cows per robot has increased.
Is the milking permission still good and do all normal cows have a check mark?
You can check whether they are all checked by selecting all cows in the status screen via Contrl + A and then choosing VMS Animal data and checking the 2nd tab Milk permission to see if they are all checked. Special cows may have a special (different) attitude.
You can check whether the Automatic Milk Permission is correct by sorting on expected milk yield in the Status screen and then checking which cows currently have and which do not have milk permission? Does this fit your plan?
And don’t too many cows have milk permission so that the cows that don’t come smoothly also have to wait for cows that only just get milk permission again with smaller milk yields and get demotivated by these cows and so bring down the capacity of the robots and your cows?
It is normal when no more than 25% of the cows have permission to milk.
October 2022:
MDi in Animal info column.
For example, when you open the Status screen, Cow Monitor or a cow card, there is a column on the left with the animal data. It contains the most important information about the clicked cow. It’s interesting to adjust it sometimes.
When you right-click in this column, “Customize Animal info” will appear.
By clicking on this you can see which data is checked and therefore shown now.
The unchecked animal data also includes, for example, “Last MDI”. When you right-click on it, “Show Report items” will appear. Then it will be checked and will be shown after “Refresh” in the Animal Info list.
It also says “Avg. MdI Last 3 days”. You can also right-click these and add them to list item.
These are interesting numbers to make it easier to see increases or decreases in MDi.
With the blue arrow above the list item you can also move the additions to the desired height.
If you like to use the Animal name of your cows, it is nice to add it here as well.
Or “Number of inseminations” or…..
It may also be useful and clearer if you “Hide Report Item(s)” that you do not use or view in the list item.
March 2022:
Main cleaning, often enough with acid.
After a cow has been milked with an antibiotic treatment, we advise to do a head cleaning.
Especially if this cow is milked just before a scheduled cleaning, this will not cost any extra time, because then the cleaning scheduled for daily times can be skipped.
And does the cleaning take place thoroughly after such a treated cow?
However, it is then cleaned with an alkaline cleaning agent.
And then a planned cleaning with acid might be skipped for a few days!
Make sure that, especially if you do not have very soft water (limescale), sufficient cleaning is done with acid. Usually every 2-3 days.
This can be checked in DelPro by: System => Cleaning Monitoring => Cleaning Overview.
But of course also on the jerry can with acid if it empties too slowly.
April 2021:
Cow statistics report.
In addition to the lists, “AMS milkings” also contain the list “Cow statistics report”.
This shows, for example, which cows are often milked and also have many or few refusals.
But also whether the cows are just as active this week as they were last week.
It is interesting to see per cow, but also the average of all cows.
This is of course especially interesting if something changes, for example a ration change, pasture, or …… (Maybe put it on “Last 30 days”)
February 2020:
Make use of the “Help” Function
Previously, a thick folder with manuals was given with the delivery of a milking robot.
However, with an update, a paper manual is of course outdated and is no longer always correct.
Instead of giving a new manual every time, it was decided to place this manual under the Help function in DelPro. Therefore, it is always in line with your current DelPro version.
It is at the very top right => Help.
If you click on “Help” and choose “? Help ” you can access the Help files. Under “Contents” you will find the entire manual and all off the help files.
Under “Search” you can enter a word or term and the help function will show all places where this keyword appears.
Under “List Topics” you will find all places where the keyword is found and if you click on a option here you will find the explanation from the manual under “Display”.
By clicking on that you will receive many answers to possible questions.
November 2019:
Check VMS Animal Settings.
A new month has started and the “Workroutine” list says that we have to check once a month the settings for individual cows.
Although the default settings are ok for the vast majority of cows, some cows require different settings, sometimes temporarily.
In order to make effective use of these Animal Settings and not accidently leave them if it isn’t necessary, it is recommended to check the overview once a month.
Take for example the “Milking Queue” list. First, click on a cow so that the bar turns blue. Second, press Ctrl + A and all cows turn blue. Third, click on “Batch Edit” and choose Batch AMS Animal Settings. Then, a list appears with the VMS settings for all selected cows.
It is especially important to look at the tab “Milk Permission” to see which cows are “Allow Action” on Automatic Milk Permission and which are not, and whether “Temporary milking permission when incompletely milked” is being used properly.
Under the tab “Cleaning”, check which cows have a different setting for Teat cleaning or disinfection other than the standard and under “Configuration”, for example, whether “Existing” is used properly on existing teats and Teats to be milked. Also check if “Direct attach to teats” and other teat attach possibilities like “Abnormal teat shape”, are still the best for that cow, or not anymore?
And is “Base take-off decision on lower flow” only used with the correct cows?
Making good use of these options offers a lot of benefits.
May 2019:
Making more effective use of activity measurement.
You know that the best time to inseminate cows is usually between 60 – 90 days after the calving date.
That is the time that the cow has likely been immersed in negative energy for a while. This means she gives already a few month more milk than the amount of energy that she can absorb from the feed she receives.
This also means that the cow does not always clearly show that she is in heat.
Sometimes, this means that the cow does not always achieve 1+ 2 ++ and 3 +++.
And this doesn’t get any better during hot summer days either …
Most cows only show their heat only for 4 – 7 hours and often also at night.
During this time, you are not all the time in the stable, but fortunatly the activity meter is.
Thus, it is very important that the system displays correct measurements.
For this it is important to know that the transponders are good – (there’s a checklist in DelPro for that) – that they’re not too loose or tight around the neck – (place a flat hand between neck and collar ) – and that the antenna is not too close to the cow recognition place, such as the VMS, selection gate, or too close to electric motors, thick walls, solar panels, cables, etc.
Since DelPro version 5.2, a “Worklist Activity” is available in which the latest knowledge of possibilities is applied using smart filters.
Through these filters, you can also find those cows that have too little activity for a +.
In this list, cows in heat are categorized as: too early for insemination, correct insemination moment or a return. It then churns out a proposal for the right insemination moment!
Lastly, the category “too little activity” you find the cow who is not fit.
This information worklist results in advice about what you can do with the cow.
Users rate this list very positively, which proves that it adds value to the system!
Ask your technician or DeLaval DelPro Advisor for this “Worklist Activity” list!
November 2017:
Lactation Graph
Since DelPro version 4.5 it is not only possible to see the lactation graph for one cow, but also for the whole herd. Go to the tab “Animal”.
We (you and I) are not only curious to see how much your cows produce but also to how it is graphed. How high are the peaks of the cows? How long do they keep it going? Is there a big difference in the curve between heifers and older cows?
In the case that cows peak at around 40-50 days, you can assume that the cow might produce a lot less in the second half of its lactation.
Questions you can ask yourself: Is the peak high enough with cows or heifers? What went wrong? Do they go down quickly after the peak? => Do they get the right ration, the right amount of feed at the right time?
Should I use a different ration when they’re set dry? Does the young cattle get the care they need to excel as heifer or cow?
A very interesting graph!
August 2017:
Automatic Milk permission
The maximum capacity of a milking robot ranges about between 150-180 milking’s per day.
(V300 a few more…)
It is crucial to allocate these milking’s to your cows appropriately. DeLaval has created a system to automate this allocation. It’s called Automatic milk permission. With this system, your cows will be sorted into 3 different groups. 1) the fresh cows, 2) cows in a further stage of lactation and 3) cows that will be put dry in a few weeks.
It is your decision when period (group) 2 starts and stops, but often we experience that too many milking’s are allocated to cows in group 2. That is positive for the average milking’s per cow per day, but cows that have lactated for more than 100 days cut in line in front of the young, new cows that have to learn to go to the robot, or go for the cows that have fresh calved and /or have other trouble.
This demotivates these animals which results in negative outcomes. Additionally, some cows from group 2 get milking permission again even though their udder may only be half full. This results in inefficient milking’s (=time).
Thus, it is important for group 2 that the permission hours are set very high with 9-10 hours and in that period permission is given to the cows when they have enough expected yield.
April 2017:
Settings around cleaning after separation milk.
When milk can’t go into the milk tank, you have four options: the milk goes into one of the three cans or directly into the drainage.
It is possible to select different types of cleaning for different situations.
DeLaval thinks it is safest to select the main cleaning after a milking containing antibiotics.
There are two possibilities when it comes to separation milk: Separation 1 and 2.
The milk programmed as Separation 1 is directed to Can 1 and Separation 2 to Can 2.
There are also two possibilities for colostrum: Colostrum 1 and Colostrum 2.
Both go to Can 3 but you can select a different cleaning program.
It can be useful to select Separation 1 or Colostrum 1 for light cases, with no penicillin but you also don’t want the milk in the tank. (Colostrum from first calving cows, a cow that has been dry for full period, calf drinking milk, etc.)
So program, “1” with a simple cleaning. And separation “2” and colostrum “2” for heavier cases (after antibiotic treatment, been dry for a too short period of time) which need a heaver cleaning.
In principle the “1”s can endure a milder cleaning than a main cleaning. The “2” would need a main cleaning.
Drainage milk will always be of bad quality or infectious for other cows and should always be programmed with the main cleaning.
“1” for easy and “2” for hard is easy to remember and also easy to explain to employees and substitutes within your dairy.
In practice, many dairy farmers select a lighter cleaning after a penicillin case because the main cleaning takes them up too much time.
I hope you understand that DeLaval perceives this to be very risky!
Using your touchscreen, you can milk cows with deviating milk consecutively. After this, VMS cleans with the biggest cleaning programmed, or you can turn on the main cleaning. This is safest and also costs the least amount of time.
March 2016:
Efficient Milking’s
Increasing the capacity of a VMS is always interesting.
In retrospect, each milking costs time. Thus, each milking costs money. So, a VMS visit must be efficient. In the Report MILKINFO => MILKING PERFORMANCE you see, among other things, which cows use the most time Milking Duration but also which cows give the least yield per milking (= average milk yield per milking) from the past 7 days.
Little milk per visit is not efficient!
Also, take a look at “Animal” => Group Milkings (be sure to set it for 24 hours) and then sort according to milking yield. It should be self-explanatory that we would rather not see any milkings under 6 liters. This, of course, is theoretical.
But, one dairy has more than the other. And many of these milkings are often from the same cows. Often, these milking jobs are incomplete and don’t let yourself be appalled at the minutes this milking has taken in the next column…
If these cows have just calved, or you have a good explanation then it’s fine. It will pass.
Otherwise:
- Could you put them dry?
- Is the milk permission for these cows set well?
- Do they need to come less often or do they need more time between milkings after an incomplete milk job?
- Are they, almost, three teated?
- ……………………………………………..?
October 2015:
Separation milk with too much blood.
Milk which consists of too much blood can automatically be separated. You can activate this setting by going to the Cow Card, then VMS Settings and selecting Automatic Diversion.
What is too much blood? Only when values are indicated above 1000, the discoloration is visible to our eye.
A cow with colostrum milk, for example, easily reaches 3000 or higher.
Many farmers do not utilize the setting to separate milk with blood automaticly. Because, the milk of a colostrum cow they separate anyway.
However, a bruise, for example, by a blow from another cow or simply a vein blood spatter, also gives a lot of blood in the milk. And we’d rather not have that in the milk tank.
You could than consider to fill in the “Udder blood threshold”. To set it for an udder you always have to deal with dilution if it’s one teat. That is why it is the best place to fill it out, for example 2500 or higher.
Setting at teat level is “dangerous”. An abundance of blood could be in a teat where there is very little amount milk. And then, all the milk from this cow will be separated.
Check the cow monitor to see from which cow you will not have milk in the tank. Then you know which level is for you too high.
By Batch Edit => Batch VMS Animal Settings it is easy to activate for all cows.
For every new cow you have to think about that again.
June 2015:
Many milking’s between 20 – 100 days in lactation
When you decided to go for (a) robot(s) one of the reasons was probably that fresh cows can be milked more frequently.
We also think that fresh cows, e.g. cows between 20 and 100 days, be milked at least 3 times per day.
Do these cows on your farm reach the expected amount of 3 times a day?
It is very easy to check, for example in the list under “Milking Info” at “Milking Performance”.
We come across differences in dairies. Some have more than 4 milking’s for this group while others can barely have 2 milking’s. And all with the same robot brand..
A sick, weak, lame cow, fresh calved, or you know why, may have less than 3, no one else.
If there are too much, for example 5 out of 20, then we must look for the cause.
- It often has to do with rumen fill or puncturing of roughage. So the operation of your roughage ration, or proportions.
- But it can also, and perhaps in relation with the previous one, have to do with the claws.
- Also, it could be that there are too many of saturating feeding the ration.
- Or they can get so much at the feedfence they don’t need the concentrate in VMS.
- And it may have to do with the stable layout, e.g. small waiting area, narrow walkways, on the place of the VMS is no fresh air, or to many flies, etc.
- Or are the settings around milking permission not good?
- Or is the robot too full?
Ask yourself which excuse your fresh calved cow can make to go the robot less often…!?
June 2014:
Color of MDi line
To get down to the use of antibiotics you are having with DeLaval VMS clear advantage.
Not only because of the Milking Technology but also because of early reading problems.
De conductivity is measured accurately each milking session and per teat. All this information will be recorded in the Cow Monitoring. That way you can easily look back at the results and see if there is a new situation or it keeps occurring. You could also check to see the differences over the whole lactation or further history results of the cow when you have to treat or she has to be put dry, etc.
Especially the MDi over the past year, the lactation year, is very interesting to look back at. (See Tip of the Month: April 2013) The only problem is the color of the MDi line. The graph is unclear and gray. To fix this you will need to go the “Reports => “Customize graphs”. After you search for “Conductivity and Blood Graph“ “Total”, double click on it, go to “Counter (udder). With “Series Color” you can choose a color that will stand out. Be sure to save all of your new settings.
Now look up an interesting cow in the Cow Monitoring, double click on it and search: “Yield, conductivity & Blood graph”. Down under you will see the MDi line in its new color. If you select to see the graph over a period of 30 days or a year, the line will be much more obvious!
May 2013:
Service Timer:
In the Computer from the VMS is a Service Timer, which most of you dairymen will know.
This will be used, for example, to know at which time to change the liners etc. Whoever has feeding on automatic program with accurate parameters will regularly need to check the list “Ration calculation log”. Whoever has the feeding manually will need to check the feed quantities every 2 to 3 weeks.
Once a month by Batch edit => checking “Batch VMS Animal Settings” ensures that the VMS will treat your cows like you want them to be treated and that old settings or adjustments won’t stay the same for the cow’s life.
Also, for example, shaving hair from udder or burn, calibrating feed or other important matters that you must not forget are handy when you are told by the Service Timer that you should not forget them.
We are people, we can think, but also we can forget. A computer never has to think and because of that will never have to forget! That is inclusive old settings as time notifications.
You can customize the Service Timer under “Monitoring and Control”.
Add your important things that you should not forget with the “new” button.
On the Monitor Board you will see notifications when something has to be done or happen.
When you have put yourself some new Timers we see you more like to watch which are overdue and that makes you and the system work better ?
January 2013:
(Automatic) Milking Permissions.
At DeLaval VMS the farmer can set what the right moment is that the cow gets permission to be milked.
Especially the first months of her lactation to be milked more than twice a day is really a “must” for the high yielding cows. (Just ask women with newborn babies). It is also one of the major advantages of robotic milking. For end lactating cows it is not good that they are milked often.
When you start miking with VMS first time all cows are set to get Milking Permission after 6½ hours. And that is a good start setting. Also new cows / heifers are set on 6½ hours and have to be checkt by you on Automatic Milking Permission.
So how should the Automatic Milking Permission be set?
The DelPro program divides the lactation into three periods. This can be found under “Farm” => “Automatic Milking Permissions”. The first period the “Early Lactation” period is immediately after calving, the period that the cow has to be milked frequently. That is also very good for stimulating hormones, instincts and activates milk vesicles. This can easily give 10 – 15% more milk!
The first period may last until the time when most of the cows get their lactation peak, usually around 60-80 days (Since DelPro 4.5 we have a very clear graph from your farm for it).
In the early lactation period, the time setting is more important than the expected milk yield and we put on 5-6 hours. For that period, we set the permission for expected yield at the level at which the cows give their top production divided by 4.
For example, your average heifers have as top in their lactation 28 – 30 kg per day, then we set the expected milk yield at 7-8, older cows average peak at 36 – 40 kg milk => put expected yield on 9.
In the second period, the “Mid Lactation” period is the story of hormones and instincts much less important.
In this period the declining production actually provide a noiseless falling visitor behavior. This is also close to natural behavior. So here is the “expected yield” most important!
With this period we play a lot more and look:
- how many cows do you have on the robot,
- how are the teat lockers,
- what is the production in that period,
- how long you have been working with the VMS (Do all cows have calved one or more times since you started with the VMS ?)
So that is not easy!
As soon as after the start-up a correct expected milk yield is known (after approximately one week) you put the second period at 7 hours with the same expected milk yield as in the first period. Then we look at the above points and first flip up the hours, step by step in a few month. At 8-10 hours. The next step is to obtain the expected milk yield to turn up. That is not so necessary when there are not so much cows on the VMS.
A rule of thumb for this is: what gives your heifer / cow around 120-150 days in lactation and that we divide by three.
Then, the expected milk yield setting is mostly the same or 1 kg higher than in the first period.
Did you say 40 or 70 cows on a VMS? That makes a big difference and with a full robot has the settings for mid lactation period to be put higher dan with 40 cows on.
Or 6.000 or 10.000 kg milk per cow per year?
The third period, the “Late Lactation” period is really for the last 2 to 3 weeks before drying off, no more than 2x a day milking: We put that at 10 hours and a very high expected yield. So then the hours are most important again.
Note that after 70 days, and especially in the second half of lactation, cows milking more than 3 times a day, even though they give much, it’s not good for the resting of the cow, the teat lockers and in total not good for the length of life from your cows!
(High average visit does do only well at birthday parties or farmer meetings …….)
It is also not good for the capacity of the robot and acidity in milk.
And gives more incomplete milking’s.
Adjustments must be made in small steps in order to keep as much as possible, the cow in its rhythm.
You do have the option for an individual cow to set separately, e.g. a high SCC cow more often or a cow with little milk or narrow teats milk less frequently.
With free cow traffic means the cow may be milked, at Feed First it means the cow has to be milked and therefore at FeedFirst the Automatic Milk Permissions may be set slightly higher.